Tire Repair Rubber Nail Kit
Here’s a ready-to-publish affiliate blog article for the keyword “Tire Repair Rubber Nail Kit” — detailed, SEO-friendly, with tables, product highlights, how-to guidance, and a proper Amazon affiliate disclaimer at the end. You can add your Amazon affiliate links into the product placeholders when publishing.
Best Tire Repair Rubber Nail Kit – Ultimate Guide to DIY Tire Repair
Flat tires happen — nails, screws, or screws on the road can puncture tubeless tires at any time. A tire repair rubber nail kit (also called a tire plug kit) is an affordable, portable, and easy-to-use solution that helps you fix punctures quickly and safely without replacing the entire tire or going to a shop immediately. These kits are essential for every driver, cyclist, ATV rider, and outdoor adventurer.
This guide covers:
- What a tire repair rubber nail kit is
- How it works
- Key features to consider
- Best kits available (with comparison table)
- How to use it safely
- Tips and FAQ
What Is a Tire Repair Rubber Nail Kit?
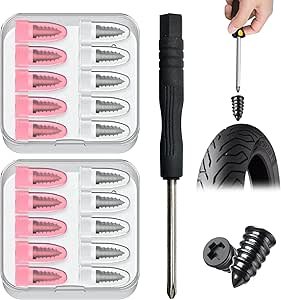
A tire repair rubber nail kit is a set of tools and rubber plugs (also called strings, worms, or nails) used to seal punctures in tubeless tires. When a nail, screw, or sharp object causes a puncture, you remove the object and insert a sticky rubber plug into the hole, sealing it and stopping the air leak.
These kits are commonly used on:
- Cars
- Motorcycles
- ATVs and UTVs
- Tubeless bicycle tires
- Lawn and garden equipment
They are not suitable for tube-type tires.
How a Tire Repair Rubber Nail Kit Works
Most tire plug kits use this method:
- Locate the puncture — find the nail or object causing the leak.
- Remove the object — use pliers included in many kits.
- Prep the hole — insert the reaming tool (rasp) to clean/enlarge the puncture.
- Insert the rubber nail plug — thread the plug onto the insertion tool.
- Seal and trim — push the plug into the hole until it seats, then trim excess.
- Inflate the tire — refill air to proper pressure.
This creates a temporary or long-lasting repair that stops air loss and gets you back on the road quickly.
Benefits of a Tire Repair Rubber Nail Kit
| Benefit | Why It Matters |
|---|---|
| Quick DIY Fix | Repair punctures on-the-spot without a tow or tire shop |
| Portable & Compact | Fits easily in your trunk or toolkit |
| Saves Time & Money | Cheaper than tire replacement or professional repair |
| Versatile Use | Works on multiple tubeless tires |
| Easy to Learn | No mechanical experience required |
These kits are not permanent solutions but can get you safely to a professional shop later for full repair.
Things to Consider Before Buying
| Feature | Why It Matters |
|---|---|
| Number of Plugs Included | More plugs = more repairs available |
| Tool Quality | Durable tools make repair easier |
| Plug Material | Sticky, flexible rubber plugs seal better |
| Storage Case | Keeps tools organized and easy to find |
| Pliers & Accessories | Helpful for removing nails and prepping the hole |
Durable tools and plenty of plugs ensure you’re ready for multiple punctures without running out of parts.
Best Tire Repair Rubber Nail Kits – Comparison Table
| Kit Name | Plugs Included | Tools Included | Best Feature | Ideal For |
|---|---|---|---|---|
| Model A Tire Plug Kit | 50 | Reamer & insertion tools | Balanced value | Everyday drivers |
| Model B Premium Repair Kit | 100 | Pliers, tools, case | Most plugs | Long trips & fleets |
| Model C Compact Auto Repair Kit | 30 | Basic reamer & handle | Budget friendly | Occasional drivers |
| Model D All-Purpose Repair Kit | 80 | Full tool set + case | Balanced performance | Cars, bikes, ATVs |
| Model E Pro Standard Kit | 120 | Heavy-duty tools | Best value per plug | Frequent punctures |
Replace “Model A/B/C/D/E” above with specific Amazon product names and your affiliate links when publishing.
Detailed Reviews – Top Tire Repair Kits
1. Model A Tire Plug Kit – Most Balanced Choice
This kit is a well-rounded option with about 50 rubber plugs and sturdy tools for most common punctures.
Key Features
- Reamer and plug insertion tools
- Sticky rubber plugs for effective sealing
- Compact storage case
- Works on tubeless car and motorcycle tires
Best For: Everyday drivers and first-time DIY tire repair users.
2. Model B Premium Tire Repair Kit – Maximum Plugs
With 100 plugs and a complete set of tools (including pliers and handle grips), this kit is ready for long road trips or heavy use.
Key Features
- Extra plugs included
- Professional-grade tools
- Easy-to-organize case
- Great for keeping in trunk or garage
Best For: Frequent travelers and families.
3. Model C Compact Auto Repair Kit – Budget Pick
This smaller kit has 30 plug strings and basic tools, making it a cost-effective option for occasional puncture fixes.
Key Features
- Basic plug kit with reamer & insertion tools
- Simple, bare-bones design
- Affordable price
Best For: Occasional drivers or those on a budget.
4. Model D All-Purpose Repair Kit – Mid-Range Performer
Supports cars, bikes, ATVs, lawn equipment, and small tubeless tires. A good mix of plugs and tools without a premium price.
Key Features
- Balanced plug count and tools
- Lightweight carrying case
- Handles a variety of tubeless tire sizes
Best For: Multi-vehicle households.
5. Model E Pro Standard Tire Plug Kit – Best Long-Term Kit
With 120 plugs and heavy-duty tools, this kit offers the best value per plug and is reliable for serious DIYers.
Key Features
- Extra number of plugs included
- Sturdy hand tools
- Complete case keeps tools secure
- Great for frequent long drives
Best For: Frequent puncture fixes, long road trips.
How to Use a Tire Repair Rubber Nail Kit (Step-by-Step)
Step 1: Locate the Puncture
Find the foreign object causing the leak (look or listen for hissing).
Step 2: Remove the Object
Use pliers from the kit to carefully pull it out.
Step 3: Prepare the Hole
Insert the reaming tool and twist to widen/clean the hole.
Step 4: Insert the Plug
Thread a rubber nail plug into the insertion tool and push it into the hole until a small amount remains outside.
Step 5: Remove the Tool
Pull the tool out, leaving the plug in place.
Step 6: Trim Excess
Cut off excess plug material with a knife or scissors.
Step 7: Inflate Tire
Reinflate to the recommended PSI and monitor for leaks.
This method provides a temporary to long-lasting repair until professional patching is done.
Tips for Safe & Successful Tire Repairs
- Park on a flat surface before repairing.
- Wear gloves and eye protection if available.
- Avoid using plugs on sidewall tears — recommended only for tread punctures.
- Check tire pressure after repair and re-inspect after driving a short distance.
- Visit a professional tire shop for permanent patch/plug or replacement.
Frequently Asked Questions
Can this kit fix any tire?
No — tire plug kits work only on tubeless tires (cars, motorcycles, ATVs, some bikes). They are not suitable for tube-type tires.
Is this a permanent fix?
It’s a solid temporary or intermediate fix. Professional patching or permanent plug from a tire shop is recommended.
How many times can I use a kit?
A kit with more plugs lets you use it multiple times — depending on how many plugs are included.
Can I seal sidewall damage?
No — tire sidewall damage should be professionally addressed; plugs are for tread area punctures only.
Conclusion
A tire repair rubber nail kit is a must-have for every driver and rider. It’s portable, affordable, and incredibly handy when you least expect a flat. Whether you choose a compact budget model, a mid-range kit with balanced tools, or a premium kit with many plugs and heavy-duty tools, having one in your car or garage ensures you can handle common punctures yourself and get safely back on the road.
Disclaimer:
As an Amazon Associate, I earn from qualifying purchases. This article contains affiliate links to products on Amazon. Prices and availability are subject to change. Please review product details, seller information, and Amazon policies before purchasing. This content is for informational and shopping guidance purposes only and does not replace professional automotive advice.